Monday, March 7, 2011

Sock Monkey Baby Shower Card

Hey everyone! Thanks to all who visited me during the Blog Hop! I loved all of your comments & thank you for becoming a follower! I hope to participate in more of these, it was a lot of fun! 
So now for the winner of my Blog Candy! I used a random picker to choose the winner. And the winner is...


Trisha said...
I am a new follower. I just love your Easter layout. Really love your blog design. Thanks for sharing and the chance to win.
trishacreates.blogspot.com
Tricia, please inbox me with your address so I can mail you your goodies!!

Here is a card I made for my cousin's Baby Shower. I really love how it came out! The invitation & room decor that she picked was monkey themed & I always like to match the theme, so this is what I came up with.
The card & envelope were made with Bazzill Bling cardstock. I'm not sure who makes the leopard paper that I used for the envelope liner. The card & envelope were made using the Martha Stewart score board. The pink flocked baby girl paper is by Heidi Grace Designs. The rest of the cardstock is all by Coredinations, except for the brown suede paper that I used to cut out the monkey. The purple background paper was made with a color cored cardstock, which is light purple on the inside. I embossed the dot pattern onto it with my Sizzix Texture Boutique & sanded the top to make the light purple appear. The monkey & rattle were cut out with the Sugar & Spice cartridge. I Stickled the hat & rattle, added a little bling to the bow, tied a ribbon around the rattle & gave her brad button eyes. The "BABY" was made with chipboard letters that have adhesive on both sides. I inked the sides & sprinkled pink glitter on top. The "oh baby" inside was stamped with an embossing ink pad, sprinkled with a pink glitter embossing gun & heated with a heat gun. 
Thanks for looking! Please feel free to leave a comment! 

Friday, March 4, 2011

BLOG HOP!!!

Hi! If you have never been here before Welcome! I am the last stop on the Blog Hop. My name is Erica & I love to craft! This is my first Blog Hop & I hope I do it right!! :) 
The theme is Spring/Easter projects & this is my part


I did a scrapbook layout of Easter 2010. All the papers & cardstock are from DCWV Flower Shower Spring Stack & Spring Carstock Stack. I used a fiskars grass punch for the layers of grass. I used 4 different shades of green & one is a metallic green, which is a little hard to see in the picture. If you click on the photo, you can get a closer view. The "Hoppy Easter", chick, basket, bunny & eggs were cut out on the Cricut using the Celebrate with Flourish cart. The flower embellishments were from a pack of American Girl Crafts stickers that I got on clearance at Michaels. I used a lot of pop dots on this layout. Thanks for looking! 


But wait, don't leave yet. Did I mention that there's Blog Candy!?! Please become one of my followers & leave me a comment & you will be entered to win


Flock, brads, eyelets, mini albums, stickers & more! Hope you win!!


If you have been following in order you should have arrived from


Beatriz - Amazing Grace -   

The Blog Hop starts at 

Lisa -  Scrappin in NJ  -                   

& then continues with

Melanie -  Scrappily Ever After -         
Melissa -   Disney Dreamers Designs - 
Mariam -  Purple Lily Studio -             
http://mariamsatchell.blogspot.com/
Kim  -   Me-Ma Kim's -                    
Crystal  -  Crafting for Caitlyn --           

Saturday, February 19, 2011

Baby Shower Card


I just made this card for a Baby Shower I went to a couple of weeks ago. The theme was bunnies & flowers, so I went with that.
I used Bazill bling cardstock for the card itself. I cut it with a paper trimmer & then scored it with the Martha Stewart  score board, which I love. The other cardstock used for the card are all by Coredinations. The cardstock behind the bunny has a light purple core & was embossed using the Sizzix Texture Boutique & a Sizzix flower embossing folder. Then I sanded the top lightly. The bunny was cut out on the Cricut using the Sugar and Spice Cartridge. The belly & the nose pieces were cut out of Terrifically Tacky Tape, which is a double sided adhesive sheet. Then I put on the sticky pieces leaving the top protective piece on. I peeled off the top piece of the nose first, so I could use pink micro beads on this part. Then I peeled off the other 2 & used pink flock on those. I gave her gem eyes, put a Prima in her hair & topped it off with a bunny head brad. The word BABY was also cut out on the Cricut using Sugar and Spice & I embossed the top layer of the letters to match.
The envelope was made with the Martha Stewart score board & a shimmery purple paper & a Purple suede  paper, but I'm not sure who makes them.
Hope you liked it! Come back & visit soon for more great projects!

Wednesday, February 16, 2011

A Gift for the Teachers


I just made these for my son's preschool Teachers. I actually gave them to them on Valentine's Day, but I wanted them to be something they could enjoy all year round, not just on Valentine's. I've been wanting to do something with my empty Prima jars & this seemed like the perfect project to use them for.

I first used Goo Gone on them to get rid of the labels & adhesive on the fronts & back. I then washed & dried them thoroughly. The papers used are from the DCWV the Grade School stack. I used the smallest 4.5" by 6.5" stack because the prints are smaller & wrapped around the jars perfectly, after I trimmed about an inch off the width. I chose the music note paper on the one because she is the music teacher. There are lots of great prints to choose from & it was hard to decide which ones to use. I used the Create a Critter Cricut cartridge for the smiling apples. For the apple charms I used the Doodlecharms cartridge. I then set each of the charm holes with an eyelet to give it more strength. I wrote each of the teacher's names in a Gelly Roll red glitter pen. I tied some skinny yellow ribbon & skinny red with white polka dots ribbon around the neck of the jars with the apple charm attached to the red one.
 
I wish I would have remembered to take a picture of the tops! I put 1 1/2 inch circles of the coordinating paper on each of the lids & topped each one with a really small metallic red heart. I filled them all with Hershey Kisses. 

I think they came out really cute & all of his Teacher's loved them. It only took me a few hours to make them & was an easy & fun project to make. 

Sunday, February 13, 2011

"Guess HOO loves you" Valentine's Day Card


I'm back!! I have a few recent projects that I've done & I want to share them with you. This is a card that I made my hubby for Valentine's Day, to be from me & my 5 year old son. I used the Hoot N Holler Cricut cartridge for this one. The cardstock used is by Coredinations. Thanks for looking! I'll have more to post very   soon. Hope you come back & visit!!!

Thursday, June 24, 2010

First Birthday Card


Here is a card that I made for my little cousin for his 1st Birthday. I used DCWV Citrus Stack for all of the cardstock except for the bear which is Bazill Bling paper. For the bear, balloon & the "Happy Birthday" I used the Create a Critter Cricut cartridge. All are on the same key. For the top layer of the bear, I used a Cricut Terrifically Tacky Tape sheet (which I picked up at Michael's on clearance!) & sprinkled on some brown flock so he is fuzzy! To finish it off, I added a star printed strip of ribbon. I think it came out really cute! I really love this cartridge, I can't wait to make more things with it!


Wednesday, June 9, 2010

Bride to Be card


I just made this card for a friend's Bridal Shower. I used the "Just Because" Cards cartridge to make the base & the scalloped border. I used the Sans Serif cartridge for the Bride to Be. Then I used the Straight from the Nest cartridge for the heart flourish. The card & flourish are made from DCWV shimmer card stock & the Bride to Be from DCWV glitter card stock. I embellished the heart with lilac rhinestones, the scallop with clear dots & dotted the i with a clear square rhinestone. 

Thursday, June 3, 2010

Recipe Box

Again, it has been WAY too long since my last post. I feel like I never have time to do what I love the most, creating. I really am going to try to find the time to catch up on my scrapbooking & projects that I have been wanting to work on & keep up with my blog.


Here is a recipe box I recently made for a friend's Bridal Shower. I really love how it came out! I want to make one for myself next! I started with an unfinished wooden recipe box that I purchased at A.C. Moore. I also picked up some pearl white paint & metallic silver spray paint. 


I removed the hinges & the latch from the box & spray painted them silver & set them aside to dry. I then painted the box with 3 coats of pearl white paint. Using the Nana's Kitchen Stack by DCWV I chose a sheet of paper for the top. I cut it out on the Cricut using the "Just Because" Cards cart. I used the duck shift key to get the die cut. I then inked the edges with shimmery blue ink. The "From the Kitchen of" logo was printed out   
on the computer onto pearl white cardstock & cut into an oval shape then inked around the edge in shimmery purple ink.


Blue & Black glitter letter stickers spell out the words on the front of the box. To finish it off, a white ribbon with tiny blue dots & a square blue stone in the center.


For the dividers I used Nana's Kitchen Stack. I don't have the From my Kitchen cart, so I cut them out by hand.


Wednesday, March 17, 2010

Easter Treat Boxes

It has been too long since my last post! I have been too busy to get any projects done! I finally had some free time over the last couple of days though & made these cute boxes for my nieces, nephew little brother for Easter.


I started with a plain white Chinese food take out box. I removed the wire handle & opened it up. I placed a sheet of 12 x 12 patterned paper from the DCWV Spring Shower Stack under it, upside down. Traced around it & trimmed off the excess with a paper trimmer. I sprayed the back of the paper with spray adhesive (after I covered my work area with newspaper. Spray adhesive is very messy!)  & covered the box with the paper. I then folded it back into shape & punched a new hole in it using my Crop a Dile Big Bite. I added an eyelet to the hole & used a Happy Easter ribbon for the new handle. I cut out bunny heads with cardstock from using the Doodlecharms cartridge & adhered them with pop dots. I cut out the kids names using the San Serif cartridge  & glued them on. I topped all the boxes with 2 layered Prima flowers & a rhinestone. Thanks for checking them out!


Tuesday, March 2, 2010


I made this card & gift bag a while back for a Baby Shower. It matched the bedding in the baby's room. I purchased the plain brown gift bag at Hallmark. I cut out stars in brown & blue & embossed them all by hand with a dot texture plate. For the card I outlined the stars & the edge of the card in a clear glitter glue. One of the things I bought to put inside was a blanket that she wanted that matched the card & bag perfectly. I really wish I would have taken a pic of the blanket too. 

Thursday, February 25, 2010

Grandma's Special Box


My son Dylan wanted to me to make his Grandma a box for her Birthday. She likes green, so I bought a metallic green & a metallic champagne paint by Folk Art. I painted 2 coats of each & 2 coats of clear glaze. I bought the letters already finished & glued them on the top. I cut a rectangle out of tan felt to fit the inside bottom & glued it into place. 

Wednesday, February 24, 2010

Sunshine Award!

I love to scrapbook & make crafts so much! I have been doing it for many years, but never really thought I would actually blog about it. Until I started reading my cousin Lisa's blog & would see all the cute things she had made & was actually a little jealous. I wanted to share all the things that I make too! Not to mention she had been trying to get me to start one for months! lol!

Well anyway, she gave me a sunshine award! Thank you very much Lisa! Here is a link to her blog http://aruplife.blogspot.com/


NOW, the rules for the award are as follows: I must pass this on to 6 of my followers. Put the logo on your blog or within your post.

--Pass the award onto 6 bloggers.

--Link the nominees within your post.

--Let your followers know that you are giving them this award by commenting on their blog

--Share the love and link to the person for whom you received this award.


I am very new to this & don't have many followers yet , so I sadly can only give 3. Here are a few blogs that inspire me.

http://scrappinbutterfly.blogspot.com/

http://beatrizguzman58.blogspot.com/

http://flowerdiscosscraphut.blogspot.com/

Tuesday, February 23, 2010

"Make a Wish" card


Here is a card that I made for my Mother-in-Law for her Birthday. I started with green Bazzill cardstock that I made into a card. I trimmed a piece of patterned paper from the Sweet Matstack by DCWV & used a Fiskars corner punch around the edges. I also trimmed a piece of blue cardstock & used the same corner punch around the edges. I layered them on the front of the card. I then stamped "make a WISH" with green ink by Hampton Art & immediately sprinkled it with green embossing powder also by Hampton Art & heated it with a heat gun. The cupcake is from a pack of Design Adhesives by Clearsnap & is a double sided patterned adhesive. I pressed it onto the cardstock, lifted up the clear top sheet & then sprinkled it with green glitter. I then glued clear bugle beads to the icing for the sprinkles. 

Monday, February 15, 2010

Valentine Treat Bags


I made these adorable treat bags for some of the kids in my family.  I also really wanted to use some more of the cute Ka-Zoo stuff that I bought!  I cut the paper to fit the front of the bag.  I put foam squares on the backs of all the die cuts.  Letter stickers from my stash were used to spell out all of the kids names.


Tuesday, February 9, 2010

Birthday Love card & gift bag

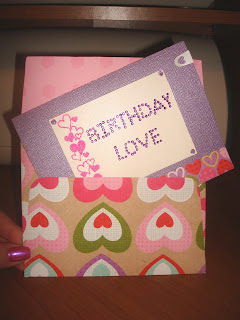
Here's a card I made for my Sister in Law. The card is made with Bazzill Bling cardstock in lilac. I stamped the hearts in pink on shimmery white cardstock, sprinkled the stamped image with pink embossing powder & heat set it. I spelled out Birthday Love with rhinestone letters. The heart border is from the Ka-Zoo collection. I made an envelope with matching patterned paper. I had to make a gift bag to go with it!


Purple Heart Box

My son & I were in the A.C. Moore a few weeks ago & he saw this box & wanted to get it. His Aunt Deanna's Birthday was coming up & she loves hearts so I said we could make it for her. I also picked up some metallic purple & silver paint, a clear glaze, some foam brushes, a smaller wooden heart for the top, chipboard letters & a sheet of glittered black felt. 


I painted three coats of purple on the inside & out & then three coats of glaze. The heart cutout got three coats of silver, a sprinkling of fine iridescent glitter & then three coats of glaze. It was then glued to the top. I flocked the chipboard "NANA" with purple flock, glued them on the silver heart & added the acrylic flower & a purple rhinestone. I cut a heart to fit the inside bottom out of the felt & glued it down. We gave it to her on Sunday & she really liked it.


Tuesday, February 2, 2010

Momma's Little Valentine

My 4 year old little boy calls me Momma & I love it! I saw this Ka-Zoo set by K & Company at the Michael's & I had to get almost all of it! All the papers are from the 12x12 pad. 


The doggy is from a pack of glittered die cuts & there are many more cute animals, like a monkey, a kitty, a butterfly & many more! I cut out the "momma's little valentine" with my Cricut using the San Serif font cartridge. I almost always use this font when I need one. I dotted the i's with tiny heart stickers. The paper borders on the left page came from a pack of many.

The heart border & card on the right page were cut out on the Cricut using the Doodlecharms cart.


I really love how it came out! It took me a few days to complete it, but it was worth it. I have to make a couple of Birthday cards tomorrow, so I will have them posted soon. I'm also almost done a gift I am working on, so that will be on here soon too.

Doggy Valentine Box

So I was at the Michael's & I couldn't resist this adorable Valentine Box by K & Company. You just have to fold & glue the box together & then add on all the cutouts & foam peices. It was so simple & only took about 15 min. to complete.